
How to Diamond Painting (step by step)
Painting with diamonds may seem like a difficult and intimidating process If you’re not familiar with the process, but we can assure you that once you get the hang of it, you will not only have a beautiful piece of art ready to be hung in your home or office but will also benefit from hours of peace and a rewarding feeling at the end of it. To help you get started, here is a step-by-step instructions about how to make your first diamond painting. If you are still looking to buy diamond paintings, start from our homepage.
Set Up Space for Diamond Painting
Depending on the size of the painting, you will need a flat surface to lay your canvas and supplies on while painting, and also to store the painting when you are not working on it. Set everything up in a manner that maximizes your reach to the tools, diamonds, canvas and your comfort.
Arrange the Painting Kit
All diamond painting kits include similar contents, including a canvas, a diamond-picking tool, a tray, wax or gel for the diamonds and obviously the diamonds themselves. You should flatten your canvas* and store away your resins in small labeled containers for better access while painting. Some people may want to tape their canvas to a board, but this may be an issue if you have a bigger painting. If you leave these steps for during the painting, your workflow will be disturbed.

Refer to the Canvas
All canvases have a guide printed on one side which helps you understand which diamonds go where. Numbers or symbols are printed against the code number corresponding to each color. Make sure you are familiar with the numbers and symbols and their corresponding colors before you start.

Pour Out the Diamonds
Once you have decided which diamonds you will begin your painting with, pour out some of those diamonds and pour them into the tray, and give the tray a little shake to get all the diamonds facing right-side up.

Peel Off the Protective Film
Peel back a few inches of the protective film covering the canvas. Be careful not to peel off too much, as the adhesive on the canvas can dry easily, and the diamonds won’t stick once it’s dry.

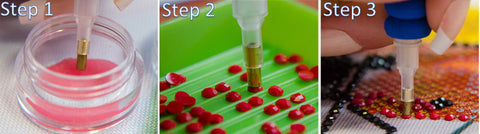
Fill Up the Pen With Wax
Before starting the painting, you need to fill up the picking tool with the wax or gel provided in your kit. Simply dip your pen into the wax to fill it up and refill when necessary. This will aid in picking up the diamonds with ease.

Start Painting
You are ready to begin your painting now. Pick up your first crystal, making sure not to apply too much pressure, and place it on a corresponding square on the canvas. If the diamond is a little crooked, nudge it to put it into place.

Continue Applying the Diamonds
Keep applying the diamonds onto the canvas in this manner, to finish the whole painting. Make sure to cover the canvas with the protective layer when you are not working on it, so dust doesn’t settle onto the surface.
Finishing the Diamond Art Painting
Finish the whole painting in a similar way, and cover with the protective layer to help it dry down further and make sure the diamonds are stuck to the canvas for good. Press it down with a rolling pin for good measure.

Frame your Masterpiece
Frame your diamond painting as a finishing touch, and hang it in your home or office to give the place a personal touch. Make sure to remove the glass from the frame, as it will only dull down the shine of the diamonds.

Follow the how to paint with diamonds article to ensure a stress-free diamond painting experience.